QuickTurnVR

Onsite capture management for 360 professionals.

QTVR Capture turns an Insta360 X5 or X6 and an Android phone into a disciplined capture rig: a live stitched preview, HDR exposure brackets, and a complete metadata record for every scene you shoot.

Insta360 X5 Insta360 X6 Android HDR / AEB GPS geotag
QTVR Capture recording a scene: a live stitched 360 preview of a room with an exposure-bracket progress bar below.
Why it matters

Consistent panoramas, fully documented, shot after shot.

360/VR projects live or die on details and organization. QTVR Capture handles both so a day of shooting arrives in post ready to stitch.

See the shot first

A live stitched preview, docked 2:1 or full 360°, that stays up through the entire capture sequence.

Real dynamic range

HDR stills plus under, over, and extra video brackets, so bright windows and dark interiors both keep detail.

Every scene documented

Grouping, description, rating, GPS, exposure, and the camera's own filenames, logged automatically per scene.

Location baked in

The phone's GPS is written straight into the camera's .insp/.insv files, plus a per-scene sidecar record.

Hands-free notes

Dictate scene descriptions by voice while your hands stay on the rig and the tripod.

Post-production data

One tap to CSV or JSON, named by project and date, ready for your stitching and tour-building pipeline.

The live view

Pan the whole sphere before you commit.

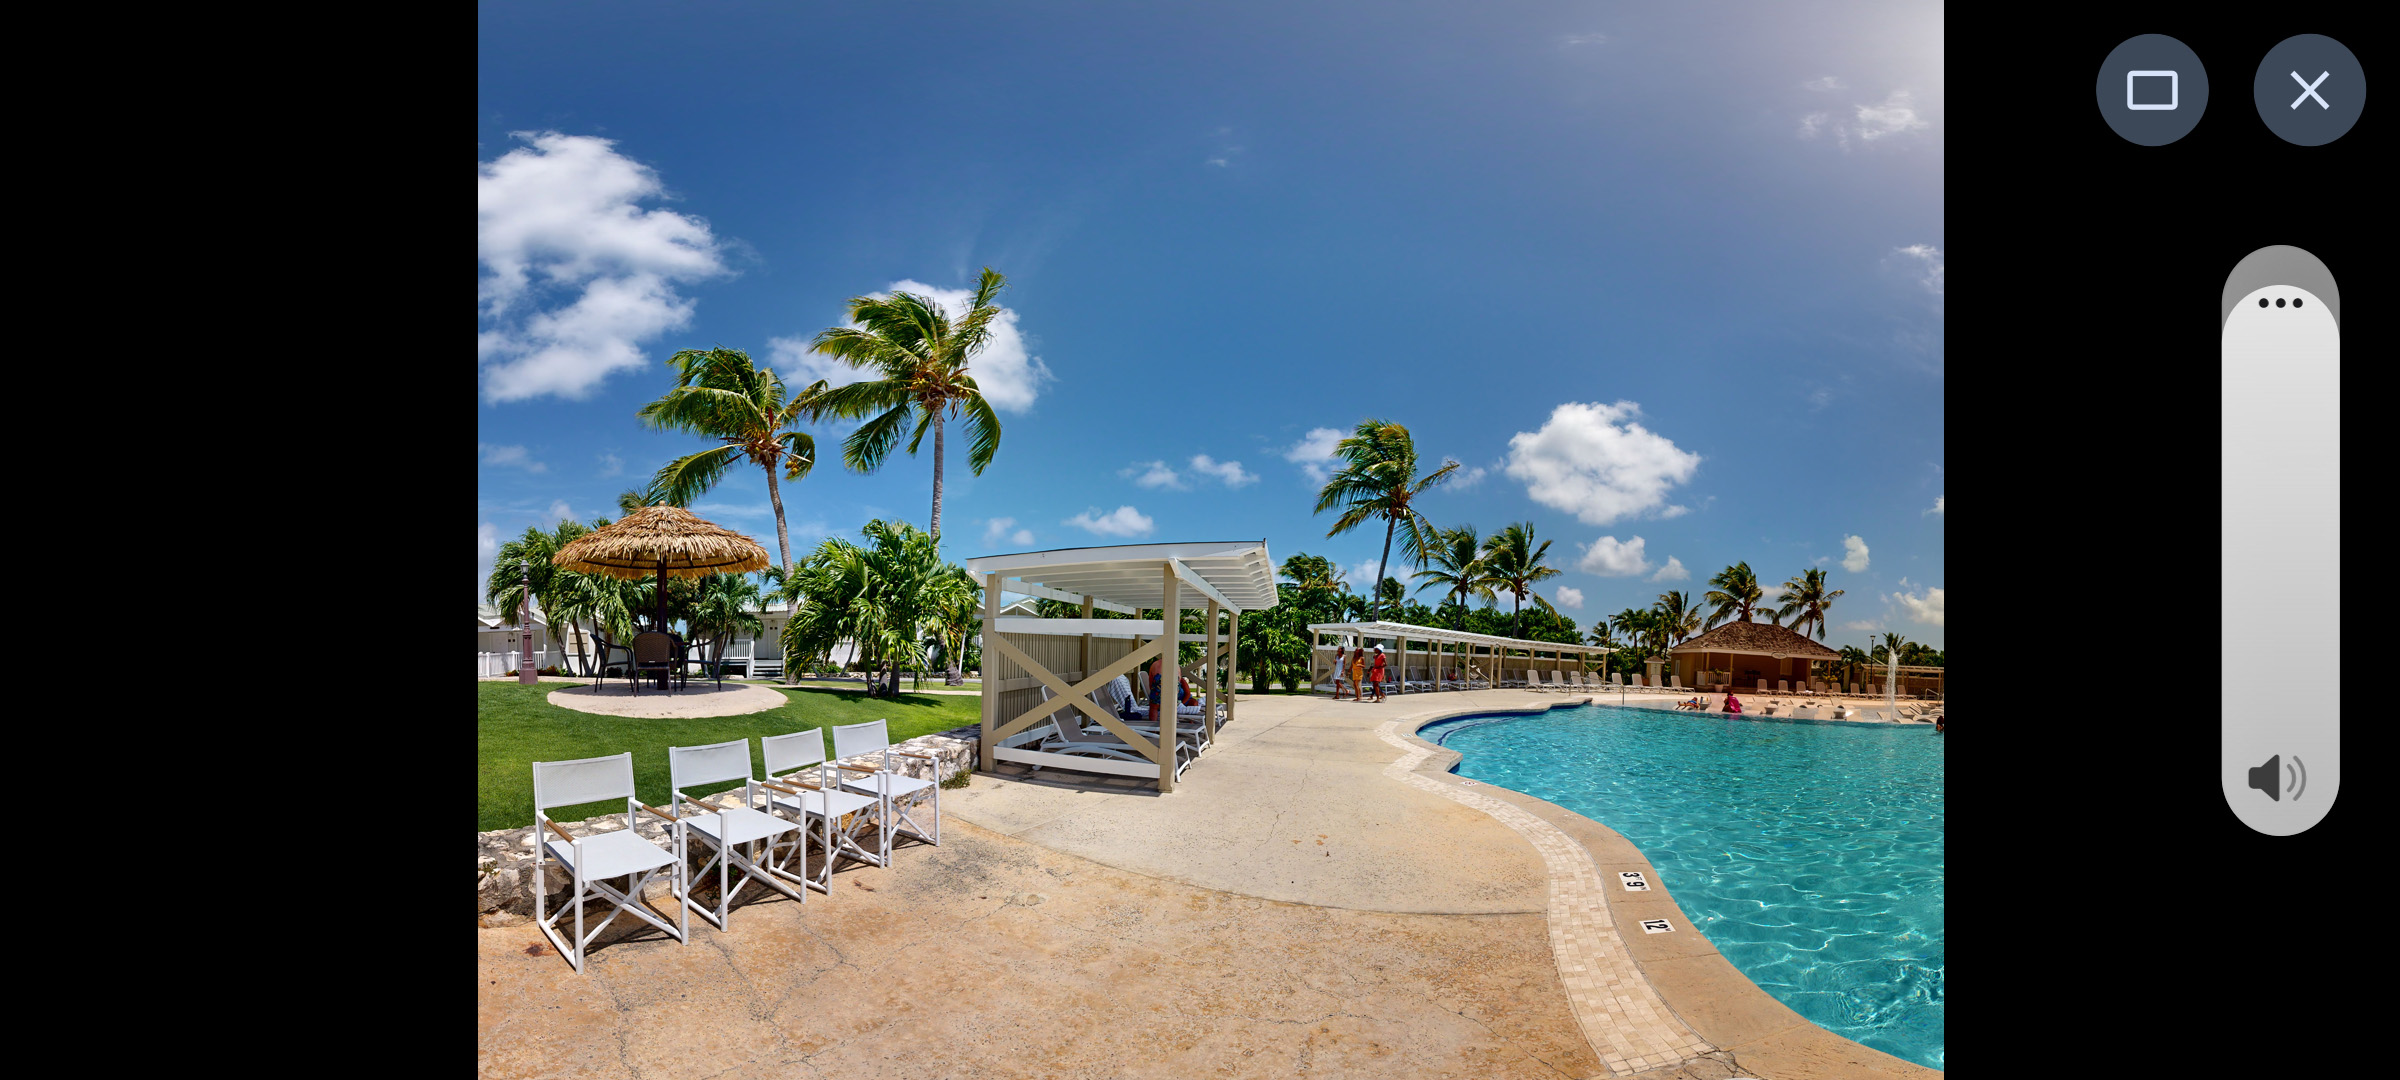
Open the preview to full 360° and drag to look anywhere, straight from the camera, so you catch a bad tripod angle or a blown-out window before you record.

LIVE 360° Full-screen 360 stitched preview of a tropical resort pool with palms and loungers, live from the camera inside QTVR Capture.
Full 360° stitched preview, live from the camera.
How it works

How a scene gets captured.

The app walks a user through the same repeatable sequence at every stop on a shoot.

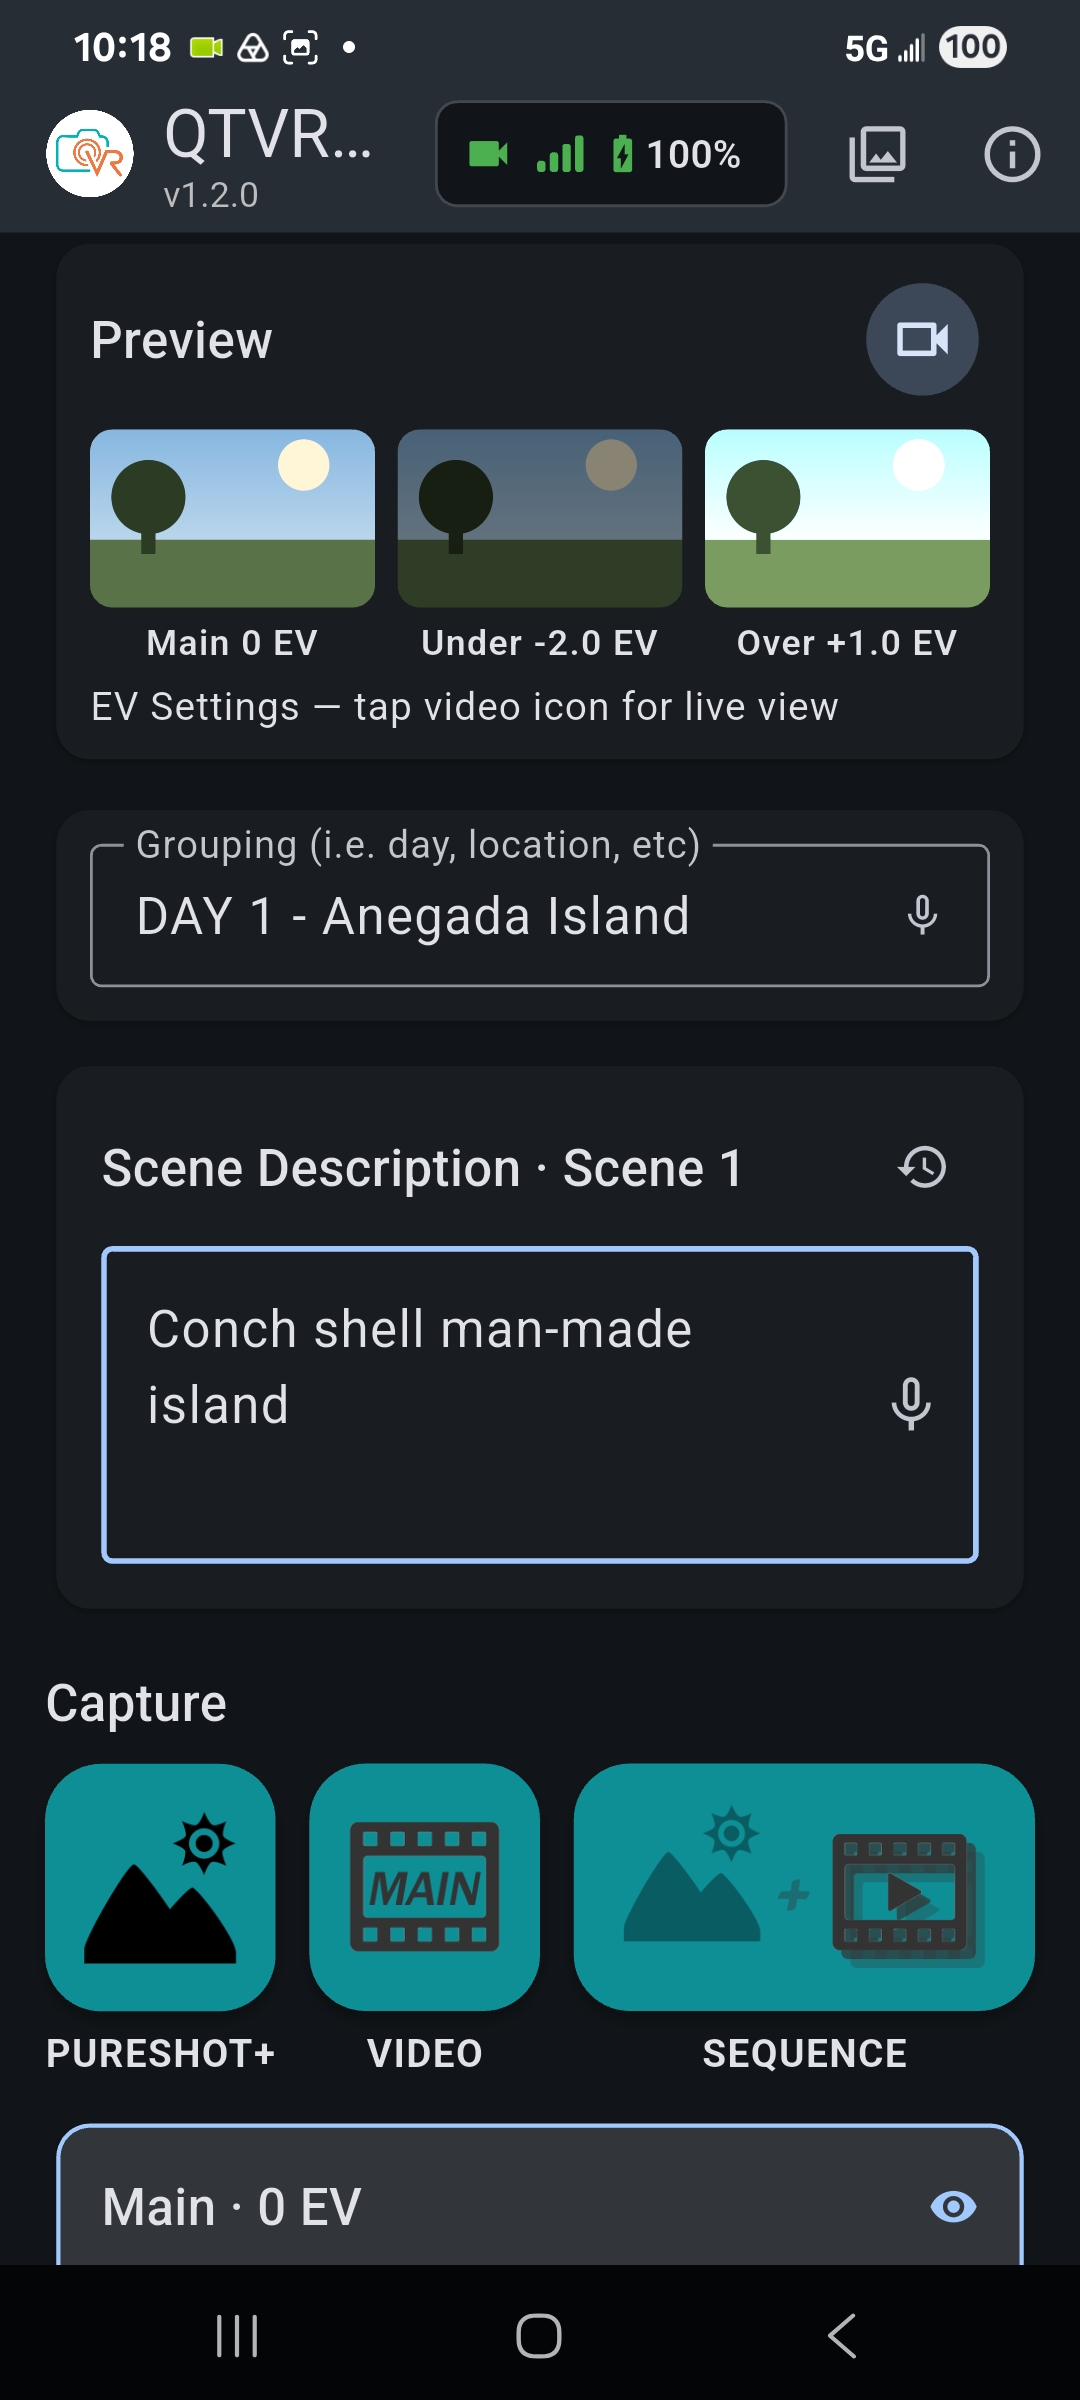
QTVR Capture home screen, camera connected: a green status chip shows the live link, signal bars and battery, with the scene grouping and description filled in.
01   Connect the camera

Power on, join WiFi, tap to connect

Switch on the Insta360 X5 or X6, join its WiFi hotspot, and tap the status chip. It shows the live link, signal strength, and battery at a glance throughout the shoot.

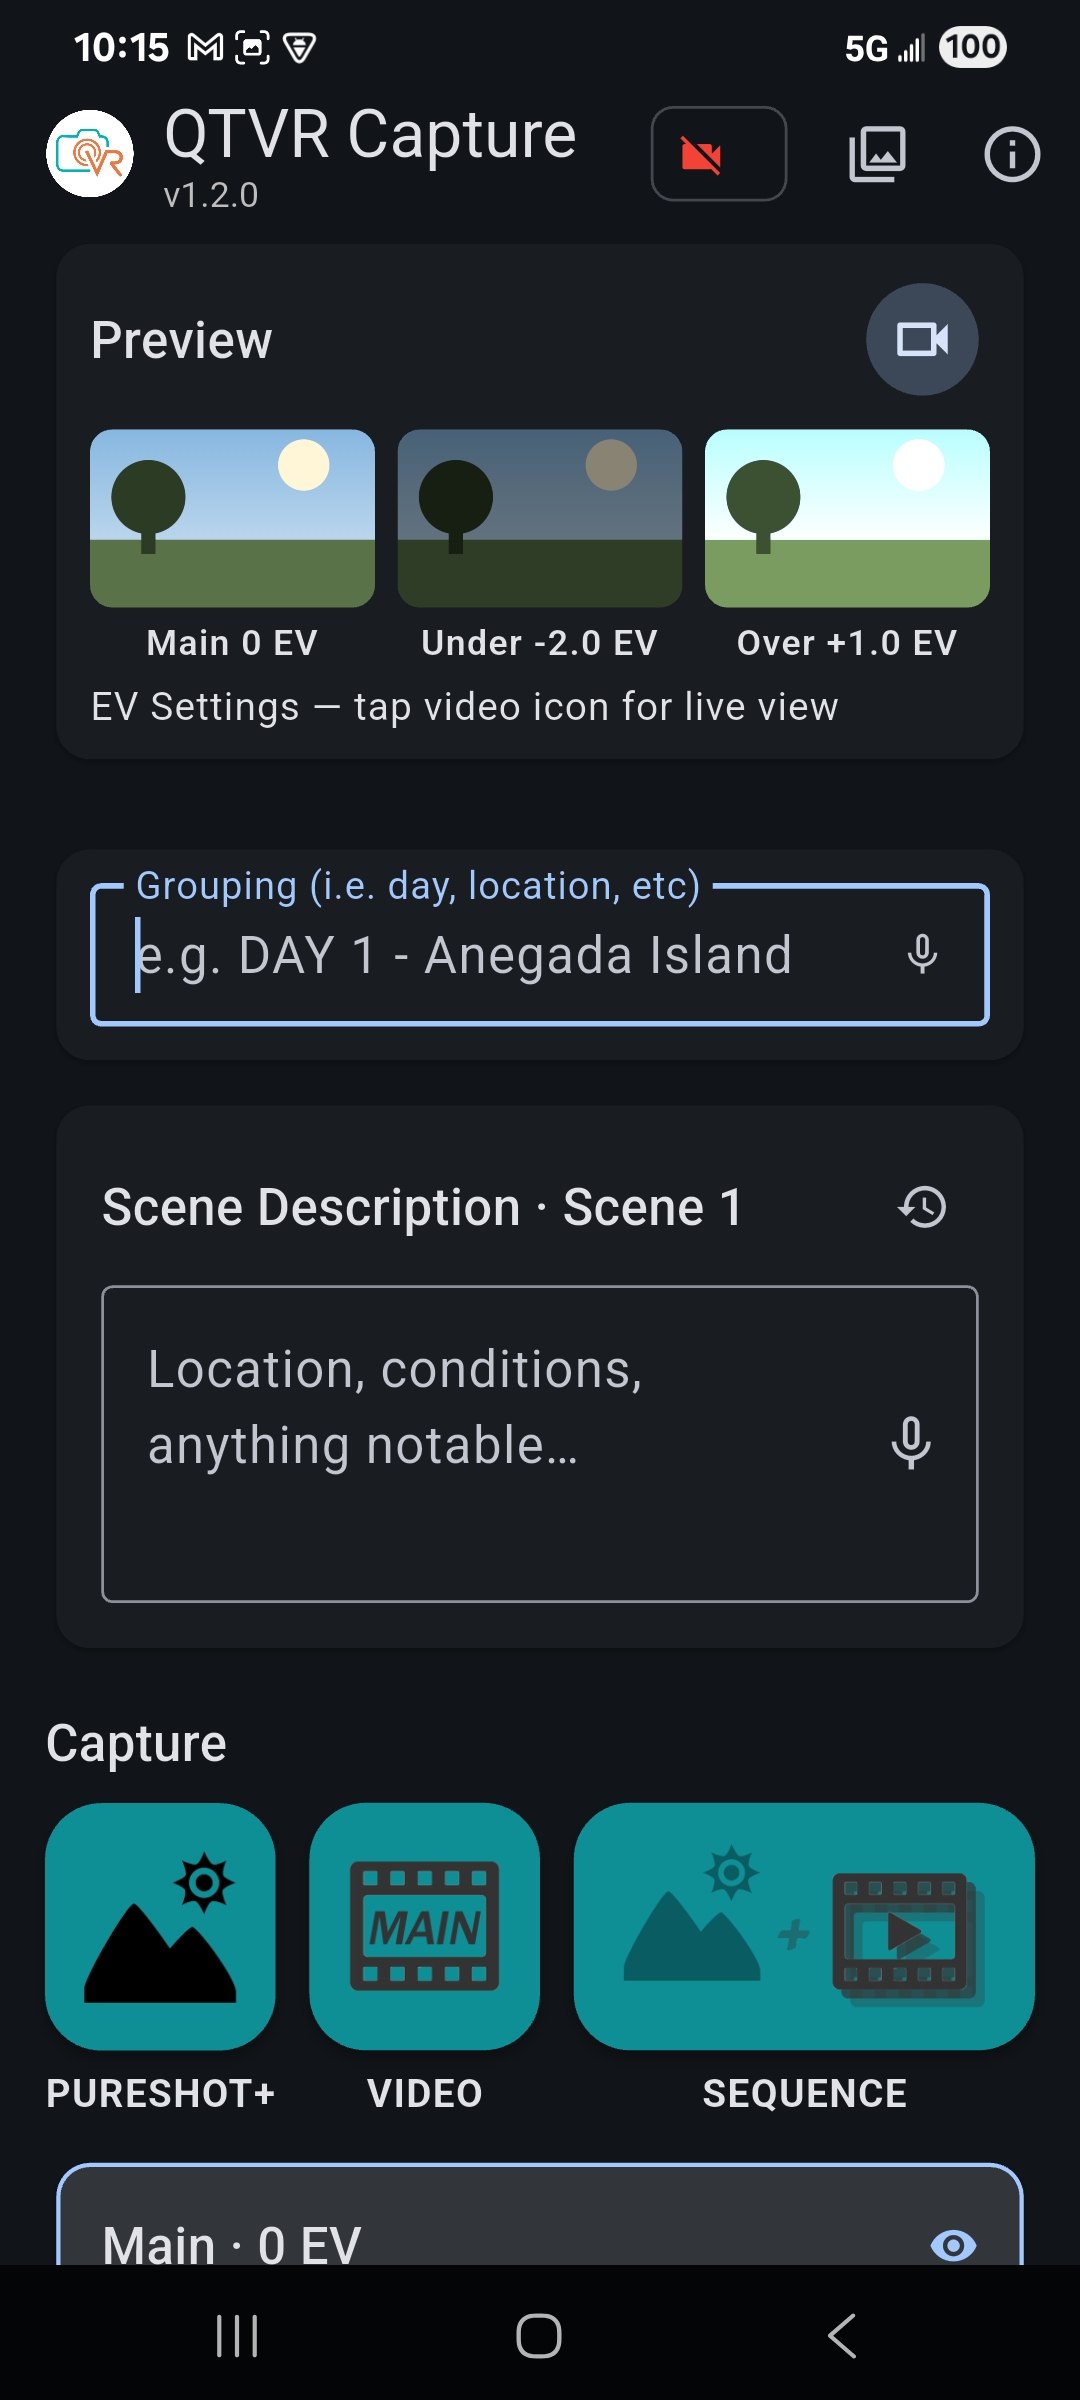
Scene metadata: a grouping label field and a scene description field, each with a microphone button for voice dictation.
02   Label & describe the scene

Type it, or dictate it

Tag the scene with a grouping label (such as "DAY 1 - Anegada Island") and a description. Type it, tap the mic and dictate hands-free, or tap the copy icon to duplicate the last scene's description.

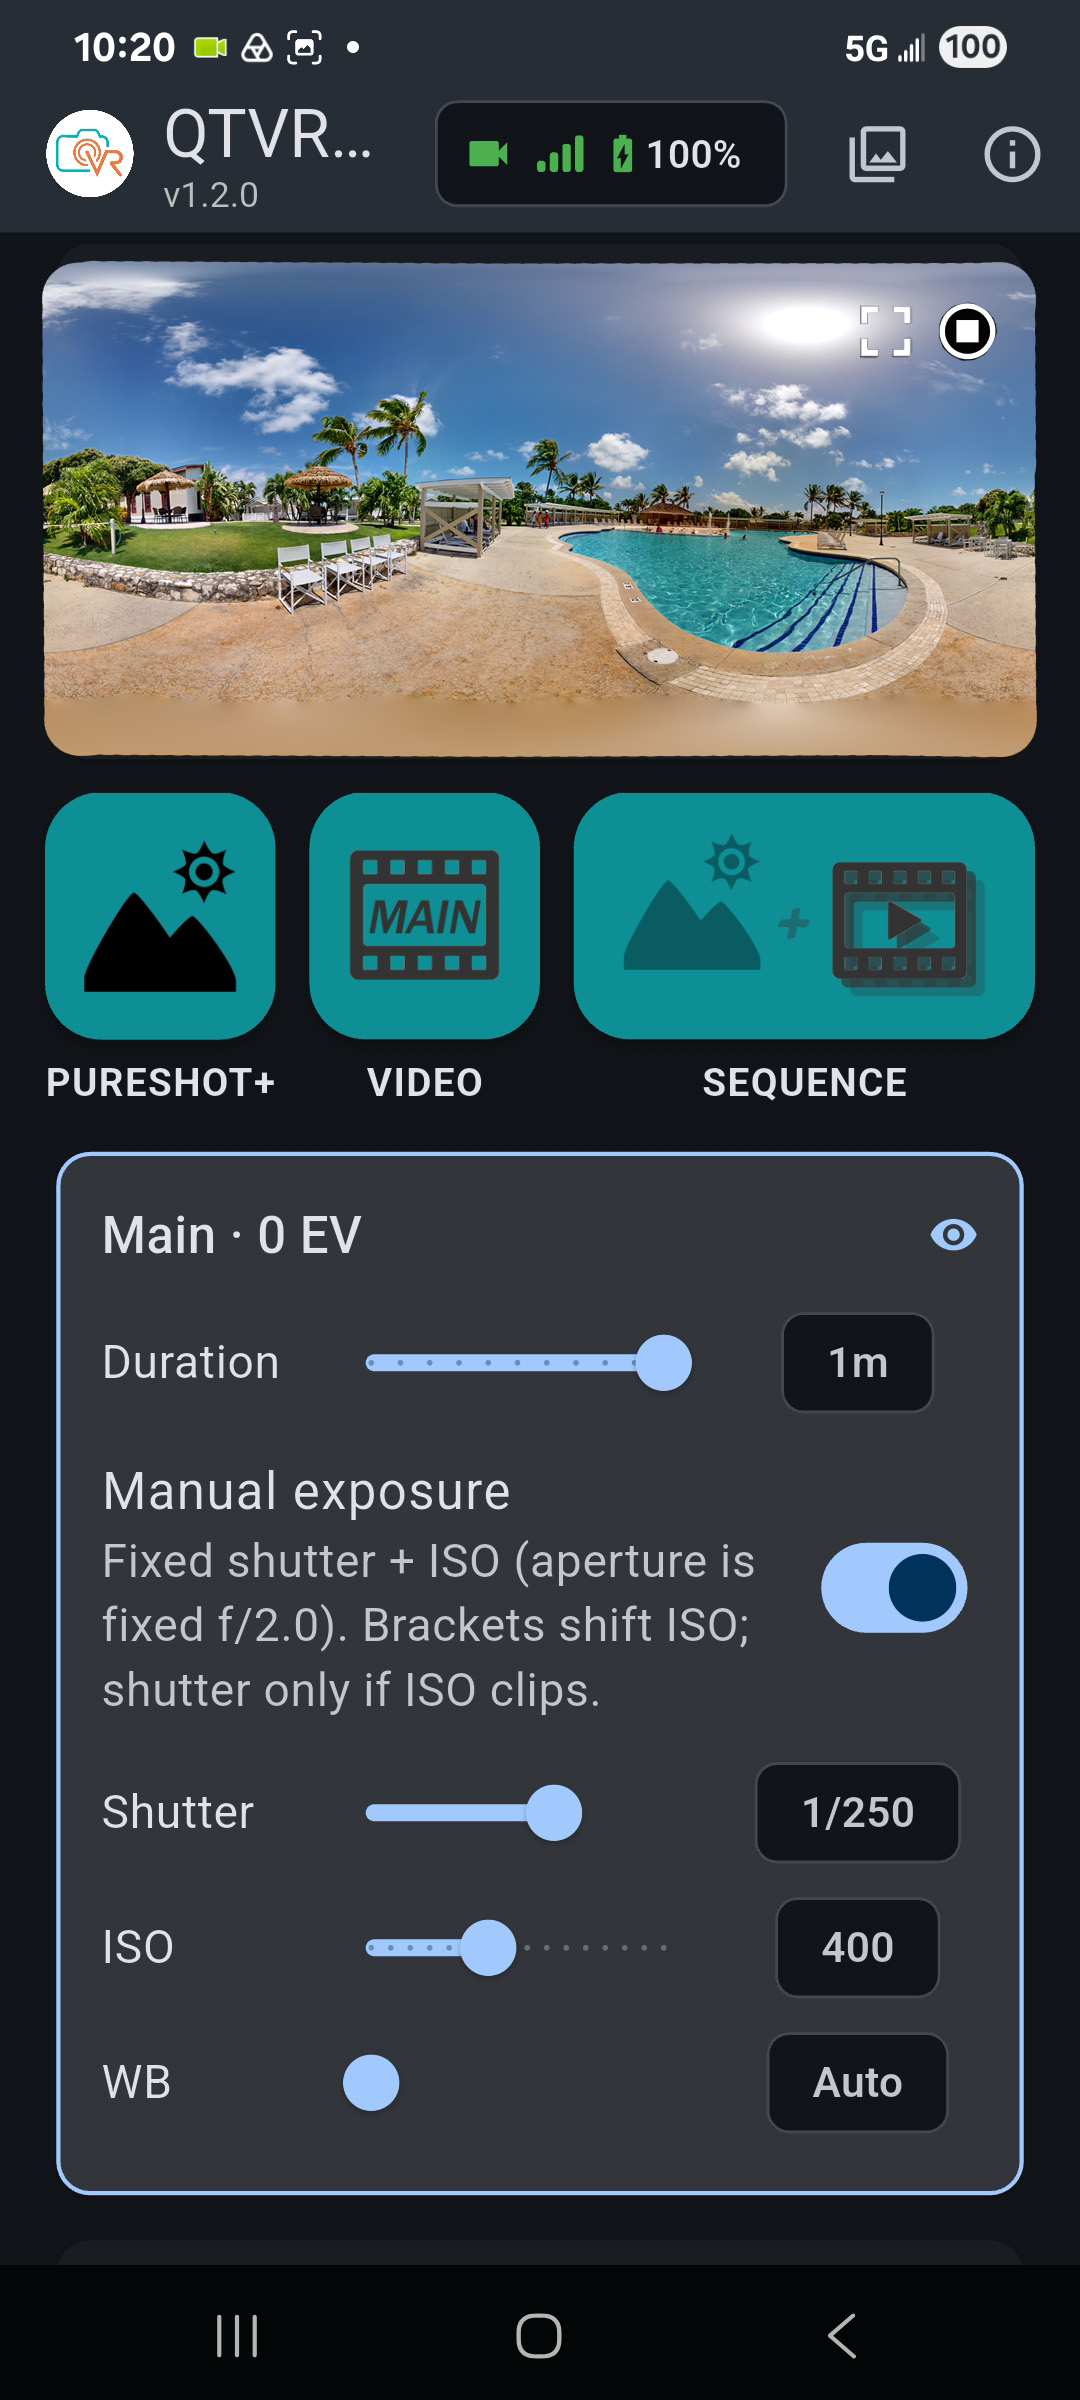
Exposure controls: Main clip at 0 EV with a manual-exposure toggle, shutter at 1/250, ISO 400 and white balance on Auto.
03   Set exposure & white balance

Auto with EV, or full manual

Shoot auto with EV compensation, or go manual with a fixed shutter and ISO. The sliders pull their values from the camera, and changes push to the live preview as you move them.

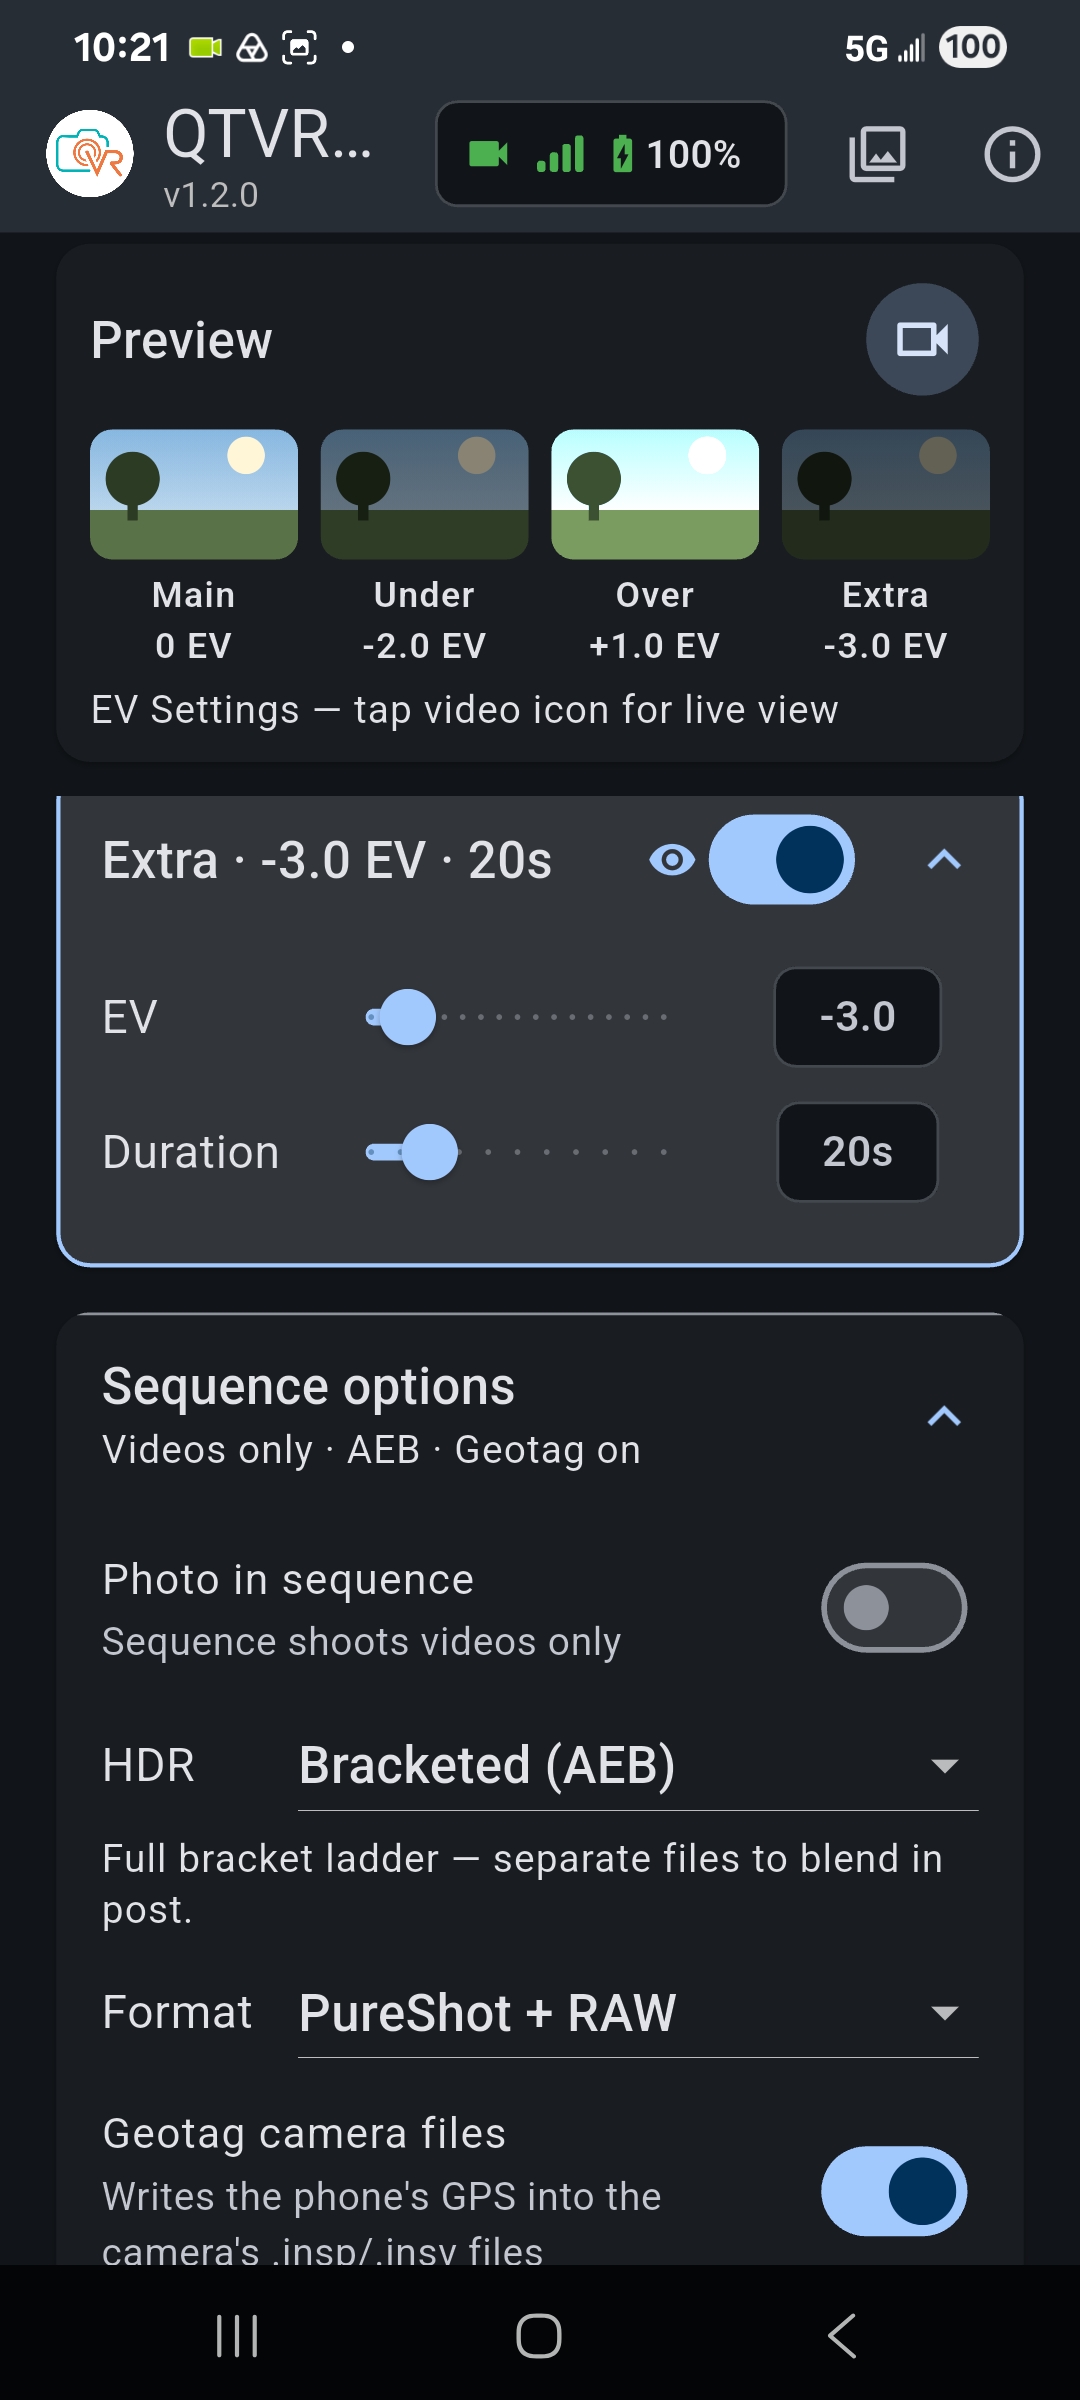
Bracket ladder and sequence options: Main, Under, Over and Extra exposures, with HDR set to Bracketed (AEB), format PureShot + RAW, and geotagging on.
04   Build the bracket ladder

Up to four video exposures, plus the option to grab an HDR still

Some pros like to expose specifically for the sky or windows, some overexpose for dark details to be layered in post. Set Main, Under, Over, and an optional Extra exposure, each with its own EV and duration. Choose the HDR still mode and format (PureShot, RAW, JPG, or valid combinations), and decide whether the photo leads the video sequence or is captured at the end.

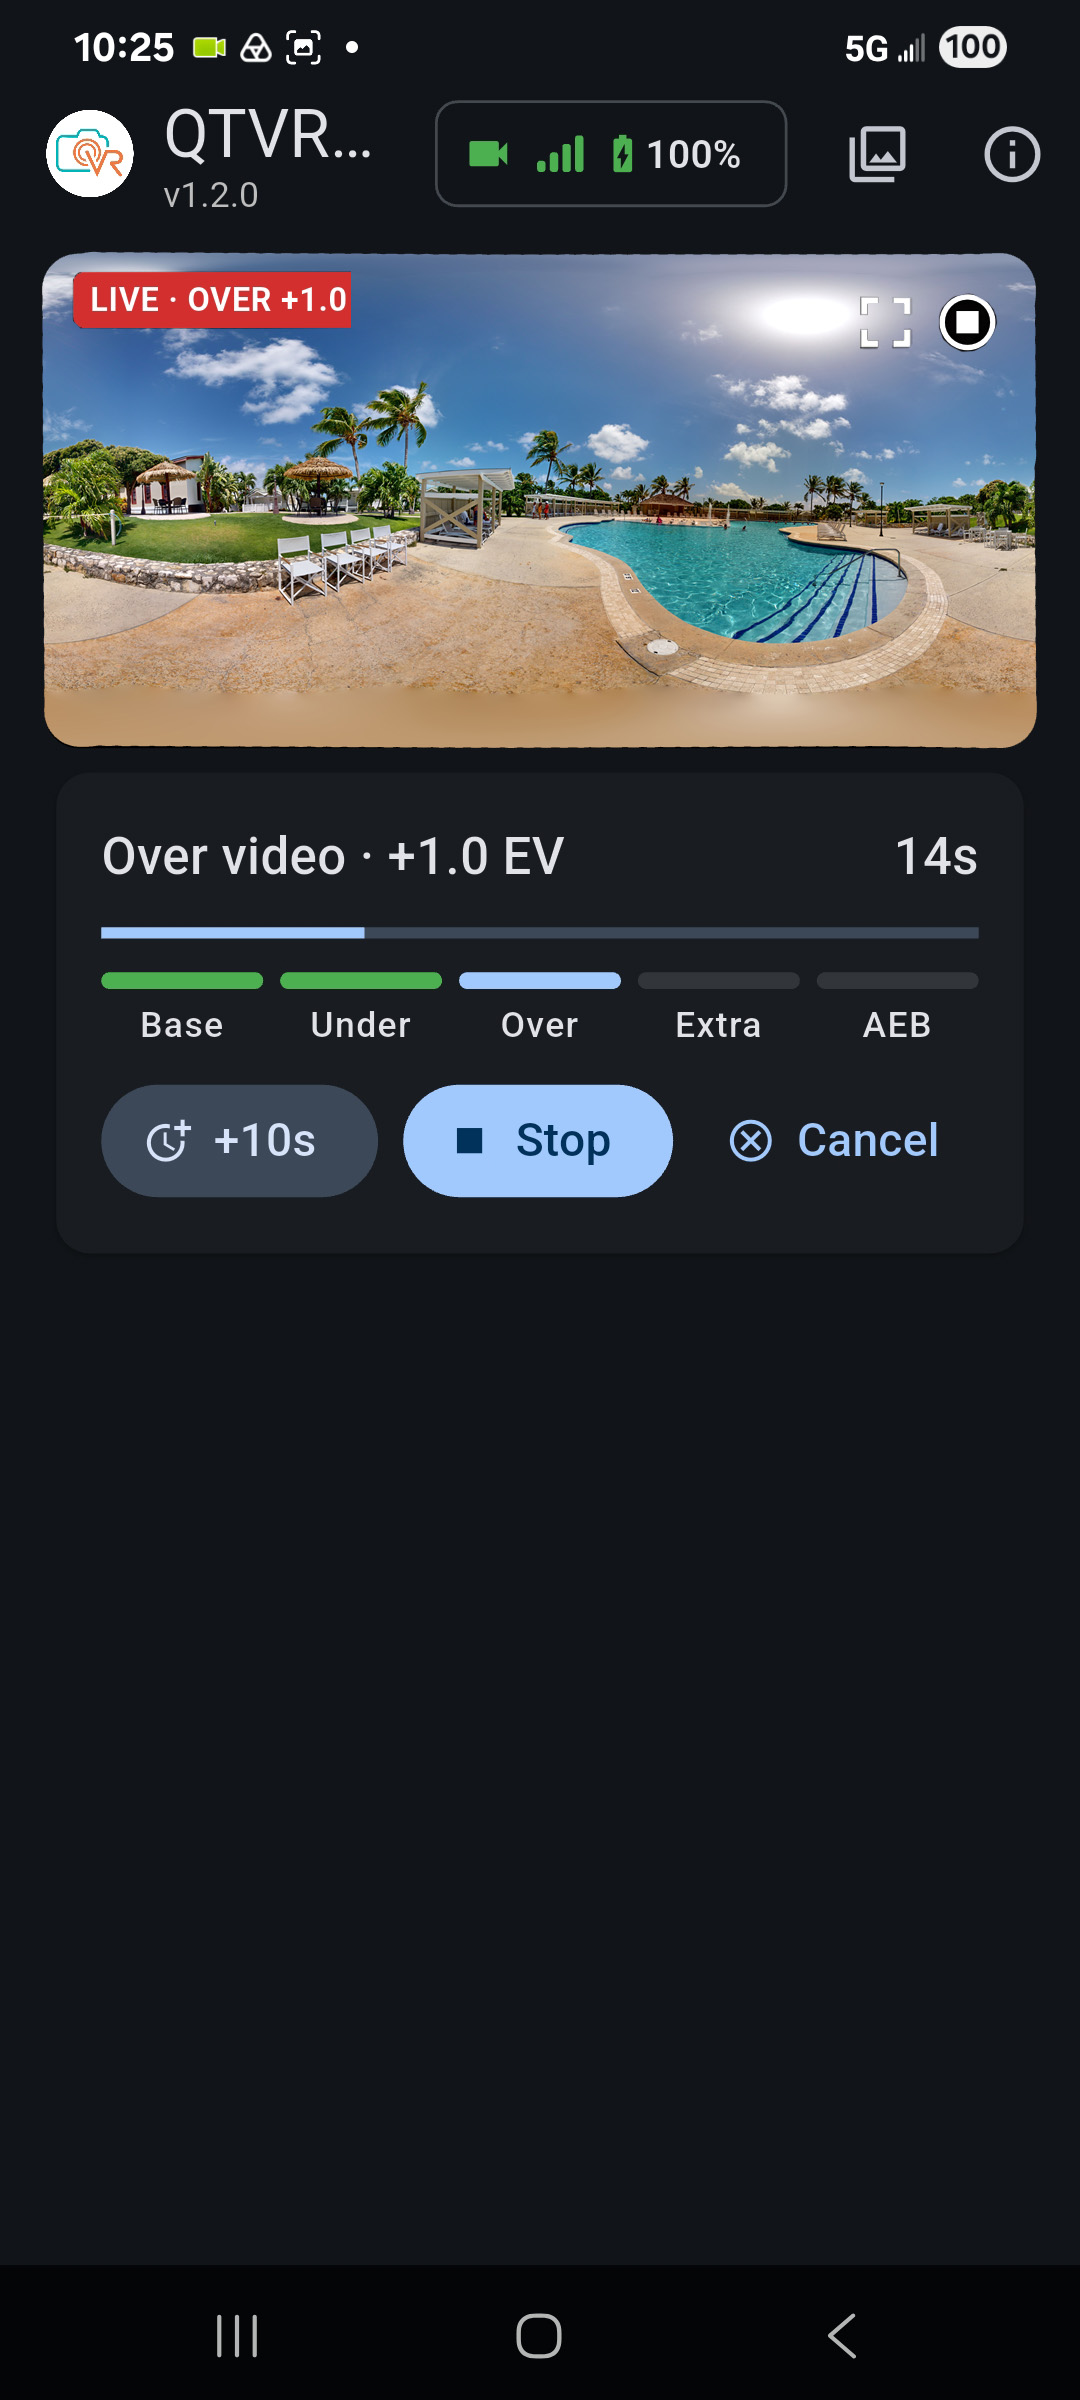
A sequence recording: live 360 preview with a labelled progress bar stepping through Base, Under, Over, Extra and AEB, and Stop, Cancel and +10s controls.
05   Capture the sequence

One tap, the whole ladder

Fire the full sequence, video only, or a single photo. A progress bar steps through each exposure while you watch it live. Depending on the action, extend a clip by ten seconds at a time, stop early to move on, or cancel. The GPS data comes along automatically.

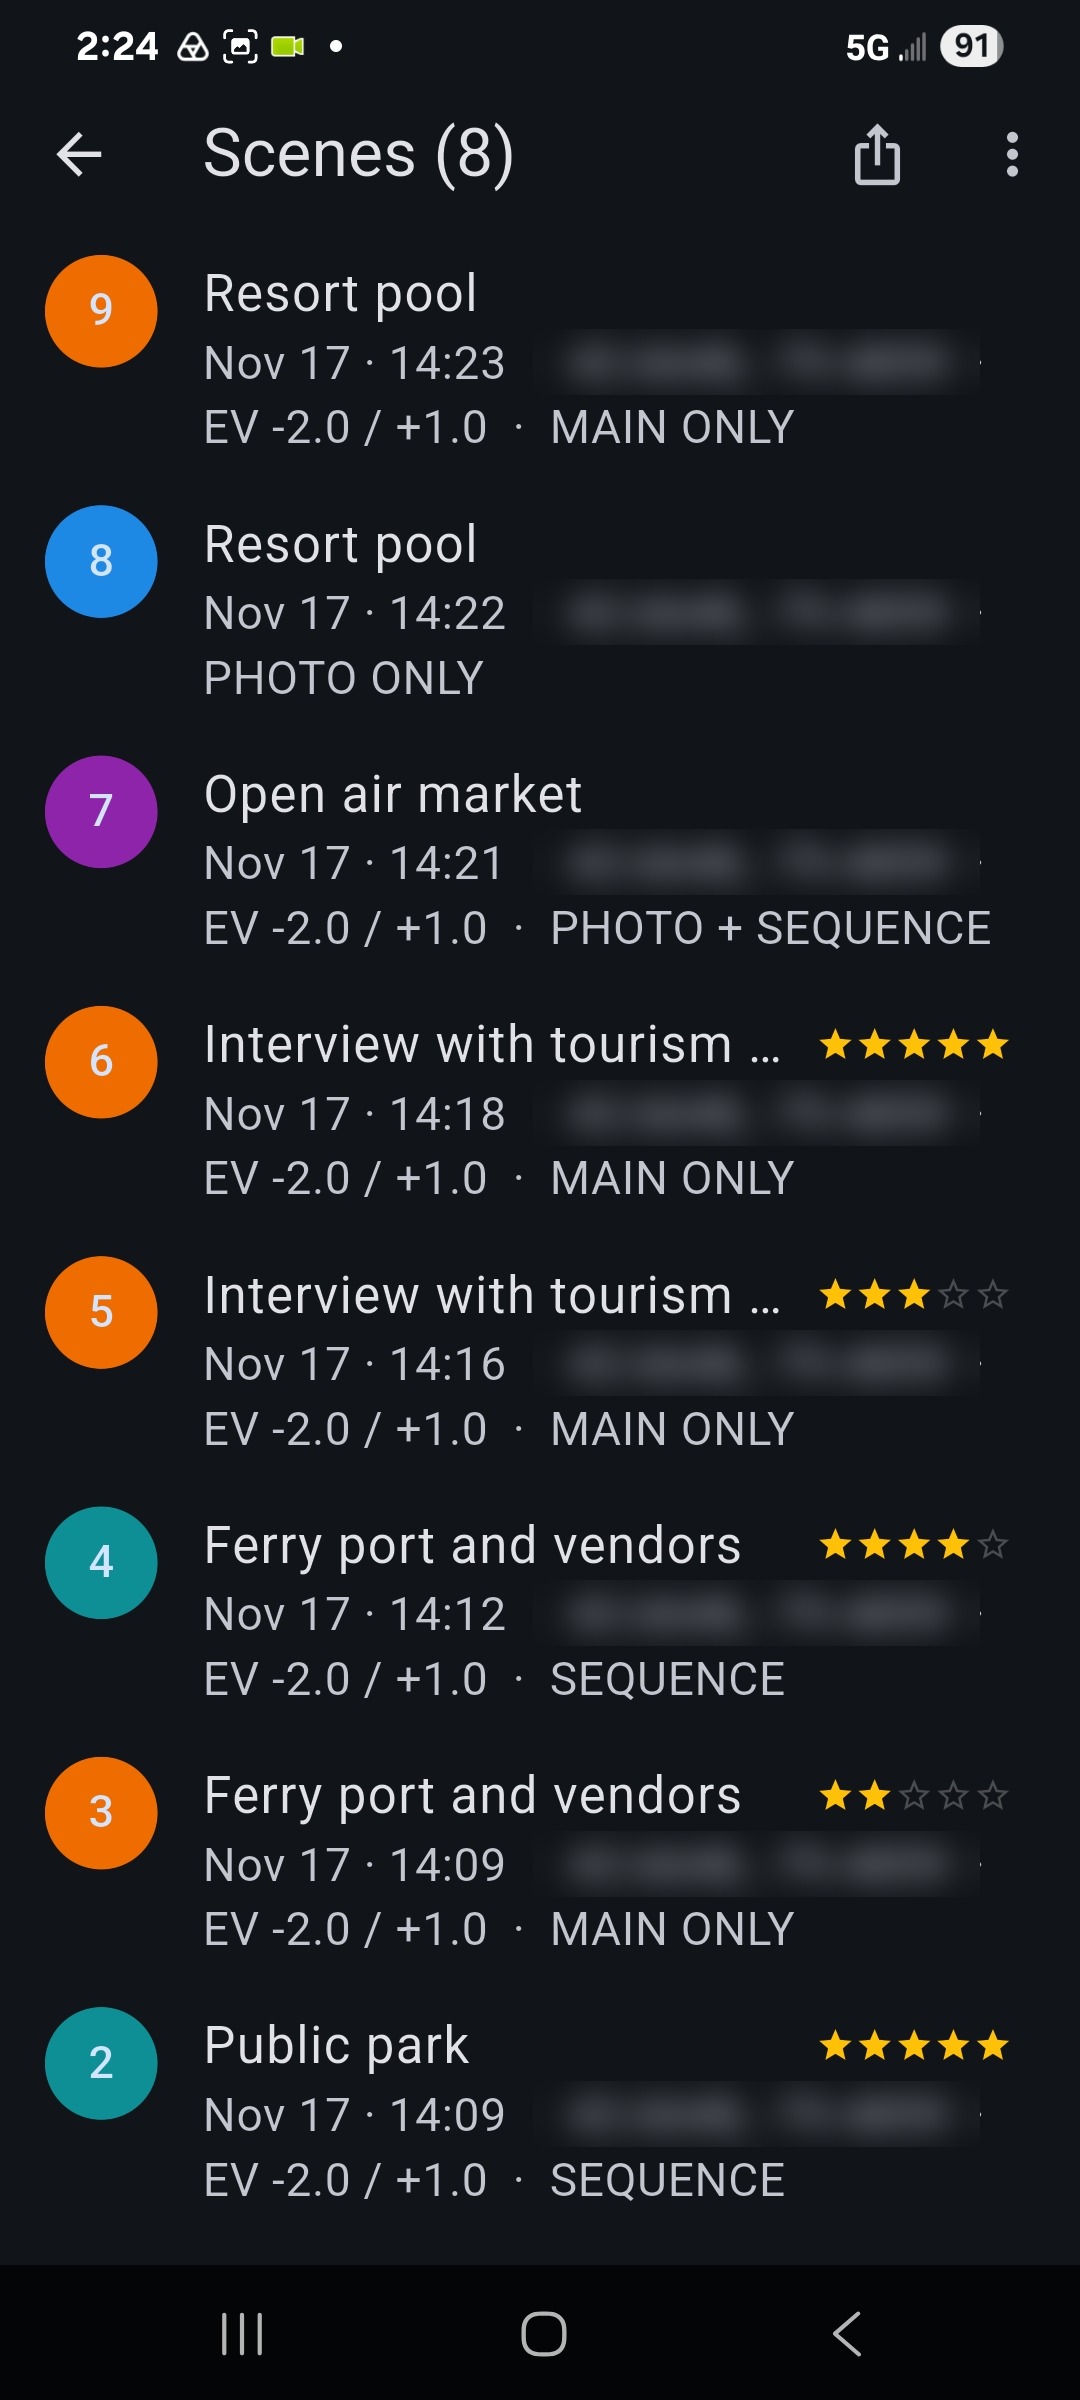
The Scenes page: a list of captured scenes, each with a number, title, timestamp, GPS coordinates, EV spread, capture mode and a star rating.
06   Review your scene data

Every scene, on one page

The Scenes page lists everything you shot, each with its title, timestamp, GPS, EV spread, capture mode, and rating.

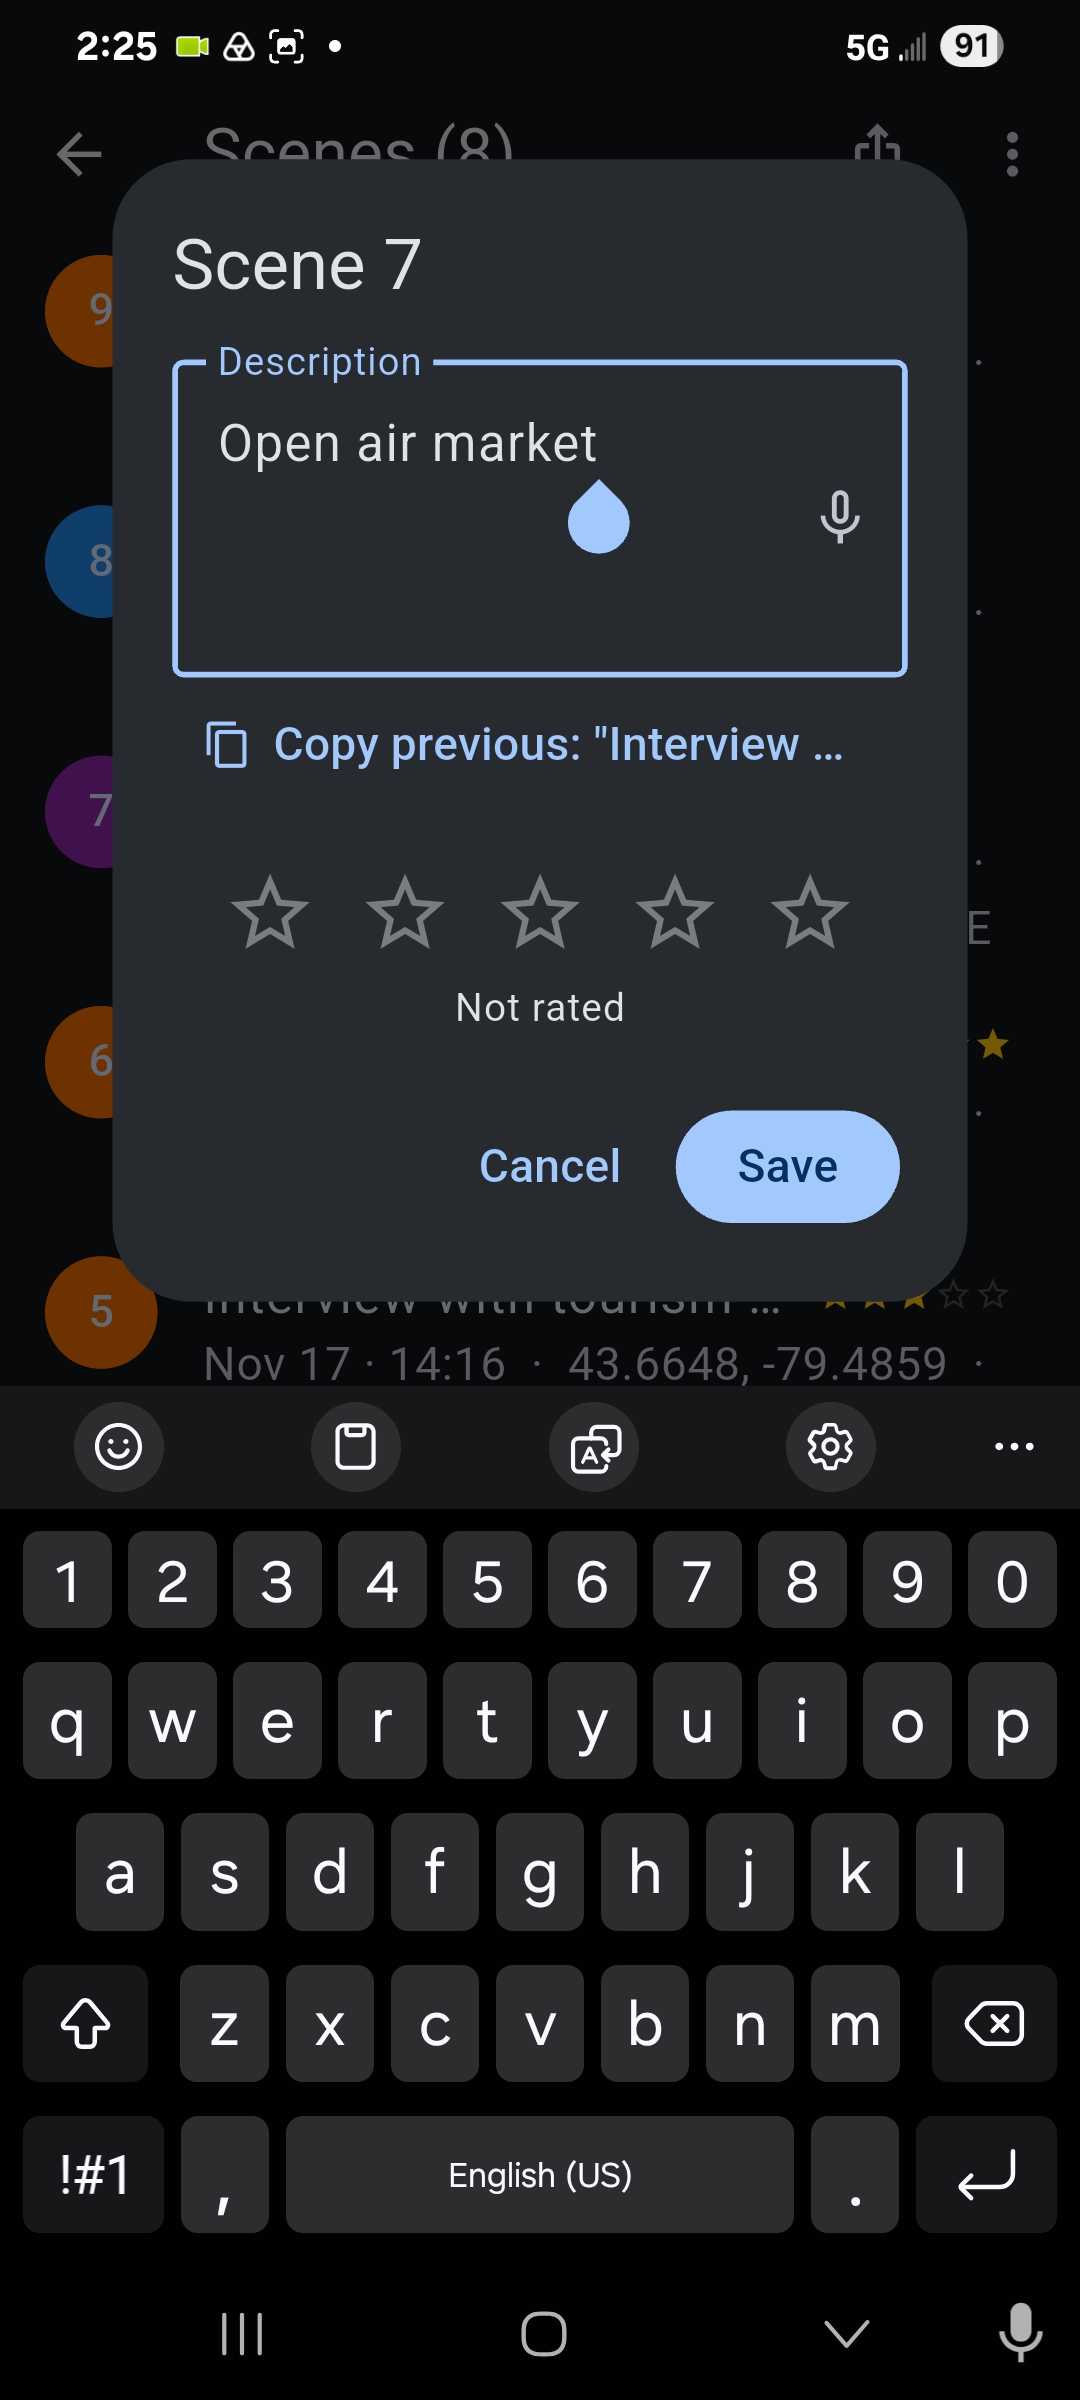
Editing one scene: its description with a voice-dictation mic, a copy-previous shortcut, and a 0 to 5 star rating.

Tap any scene to fix its description (type or dictate) or re-use the last one with "copy previous".

Tap an optional star rating so you don't have to guess in post which takes were the keepers.

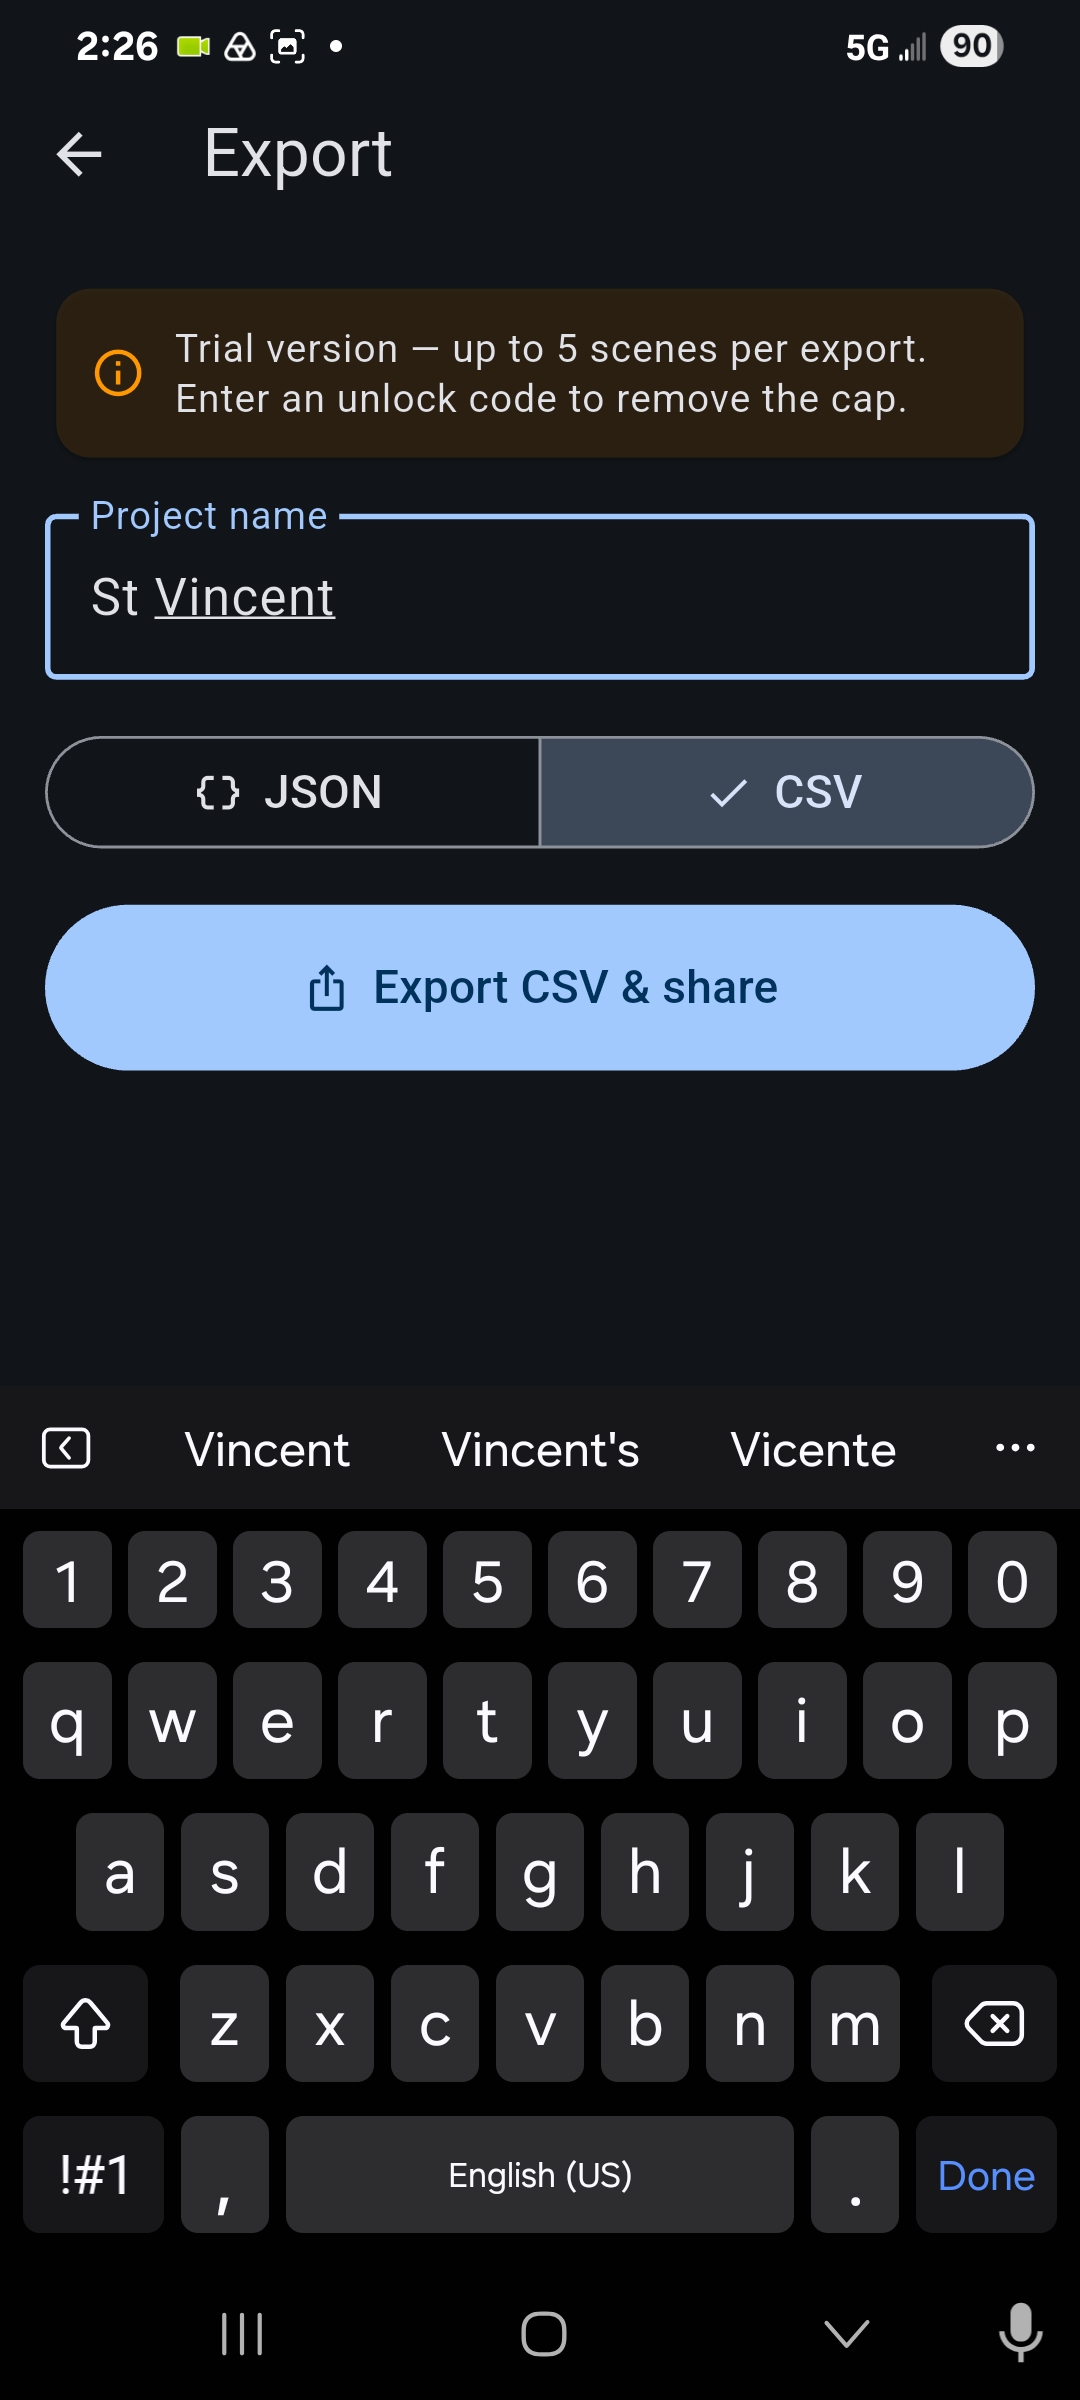
The Export screen: a project-name field, a JSON / CSV toggle with CSV selected, and an Export CSV and share button.
07   Export the shoot

Share as CSV or JSON

Name the project, pick CSV (Excel-ready) or JSON, and share. Files are named by project and date, so the whole log drops straight into your stitching and tour-building pipeline. No more endless viewing of clips to find that money shot!

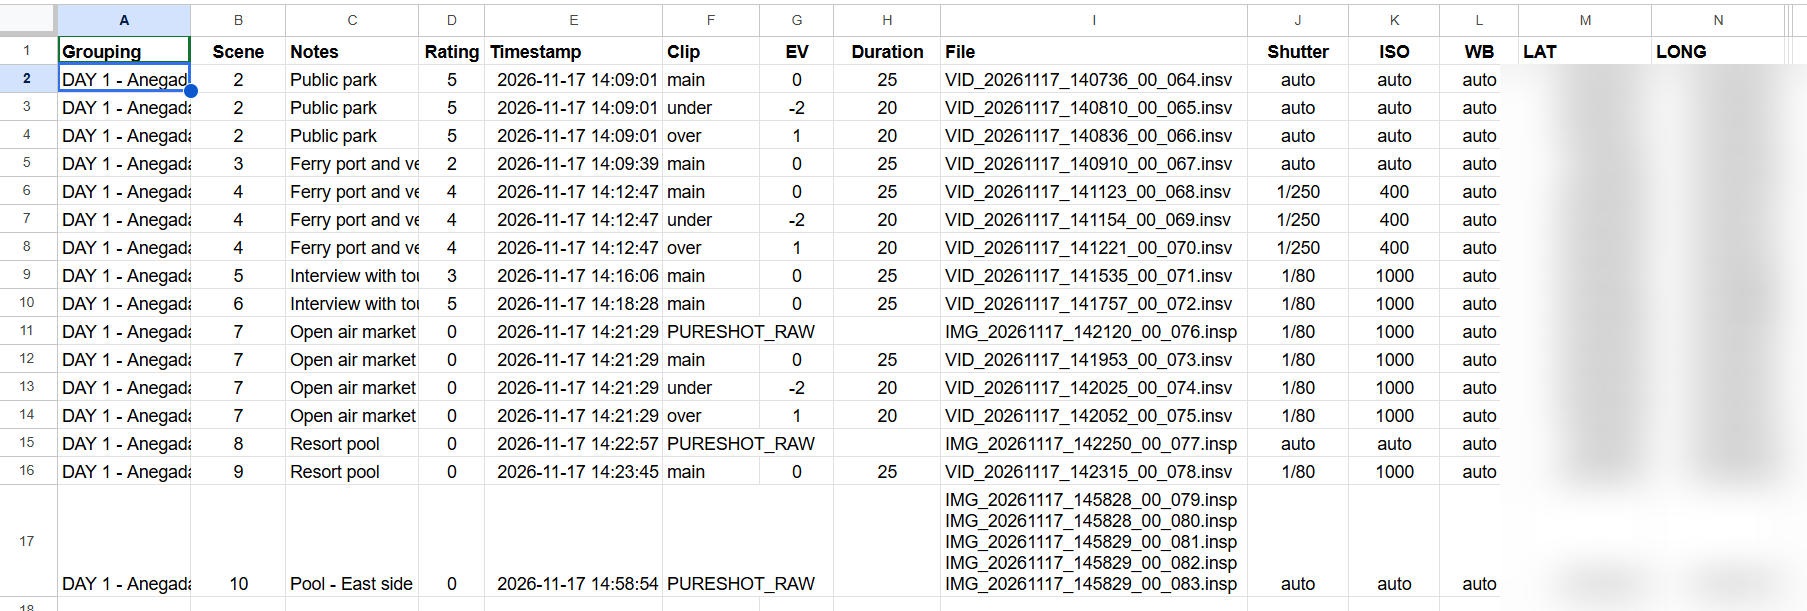
The exported CSV opened in a spreadsheet, with columns for grouping, scene, notes, rating, timestamp, clip, EV, duration, file name, shutter, ISO, white balance, latitude and longitude, one row per clip and still.
The CSV export opened in a spreadsheet — one row per clip and still, ready to sort, filter and hand off.
What it records

Every scene arrives in post fully documented.

Nothing has to be reconstructed from memory. Each scene carries its own structured record alongside the camera's files.

  • Camera filenames and intent — flagged as Main, Under, Over for every clip. Photo AEB files are grouped into the same cell so you don't have to guess!
  • Grouping label — e.g. "DAY 1 - Anegada Island", persistent across scenes.
  • Description + star rating — typed or dictated by voice.
  • GPS coordinates — in the record and as metadata within the camera files.
  • Exposure per clip — EV, shutter, ISO, and white balance.
  • Actual clip durations — what really got recorded, not just the target. Filter garbage easily!
Built for the field

Reliable where the signal isn't.

Location shoots are unforgiving. The app is hardened against the ways a camera link fails in the real world.

The link stays alive

A foreground service holds the camera connection open so a locked or backgrounded phone won't drop a recording mid-sequence.

Auto-recovery or Alert

If the camera sleeps or drops the connection, the app reconnects automatically. If a capture event results in no file, a shake and alert tells you immediately. No app restart, no lost scene.

Signal & battery in view

A live signal meter warns on a weak connection, and the camera battery is always on screen.

Won't quit mid-capture

A stray Back press warns before it closes the app, so you can't accidentally end a recording or drop the camera link.

Partner program

Interested in becoming a Partner?

Put QTVR Capture to work on your own 360° shoots. During Beta testing we are distributing the app for free per request. We also have advanced programs to help with your Content Delivery (VRQR.CA) and custom integration of Matterport for dynamic hospitality tours.

Get in Touch